Project NFT Collections
An NFT collection is a collection of unique items on the blockchain that can serve various functions within the economy of your game. These items can represent skins, consumable resources, achievements, or other in-game assets. The Faraway Platform allows you to create these items and perform a variety of smart contract transactions with these items as inputs.
NFTs are transferable items, meaning users can send them to each other or sell them on secondary marketplaces. When items from your collection are sold, your project will earn royalties, which represent a percentage of the sale price.
Before your Project can start minting items on-chain, a Collection must first be created for those items to be minted into. Keep in mind that before you can create a Collection for your Project, your Project must be published and show an "Active" status on the Developer Portal. Learn more about publishing your project here.
Steps to Create Project Collection
-
Required Role:
Account Owner, Admin, or Developer. -
Navigate to the Manage Section:
Click on the Manage section in the navigation bar and go to the Collections section. -
Create a New Collection:
Click on the Create Collection button in the top right corner. -
Specify Collection Details:
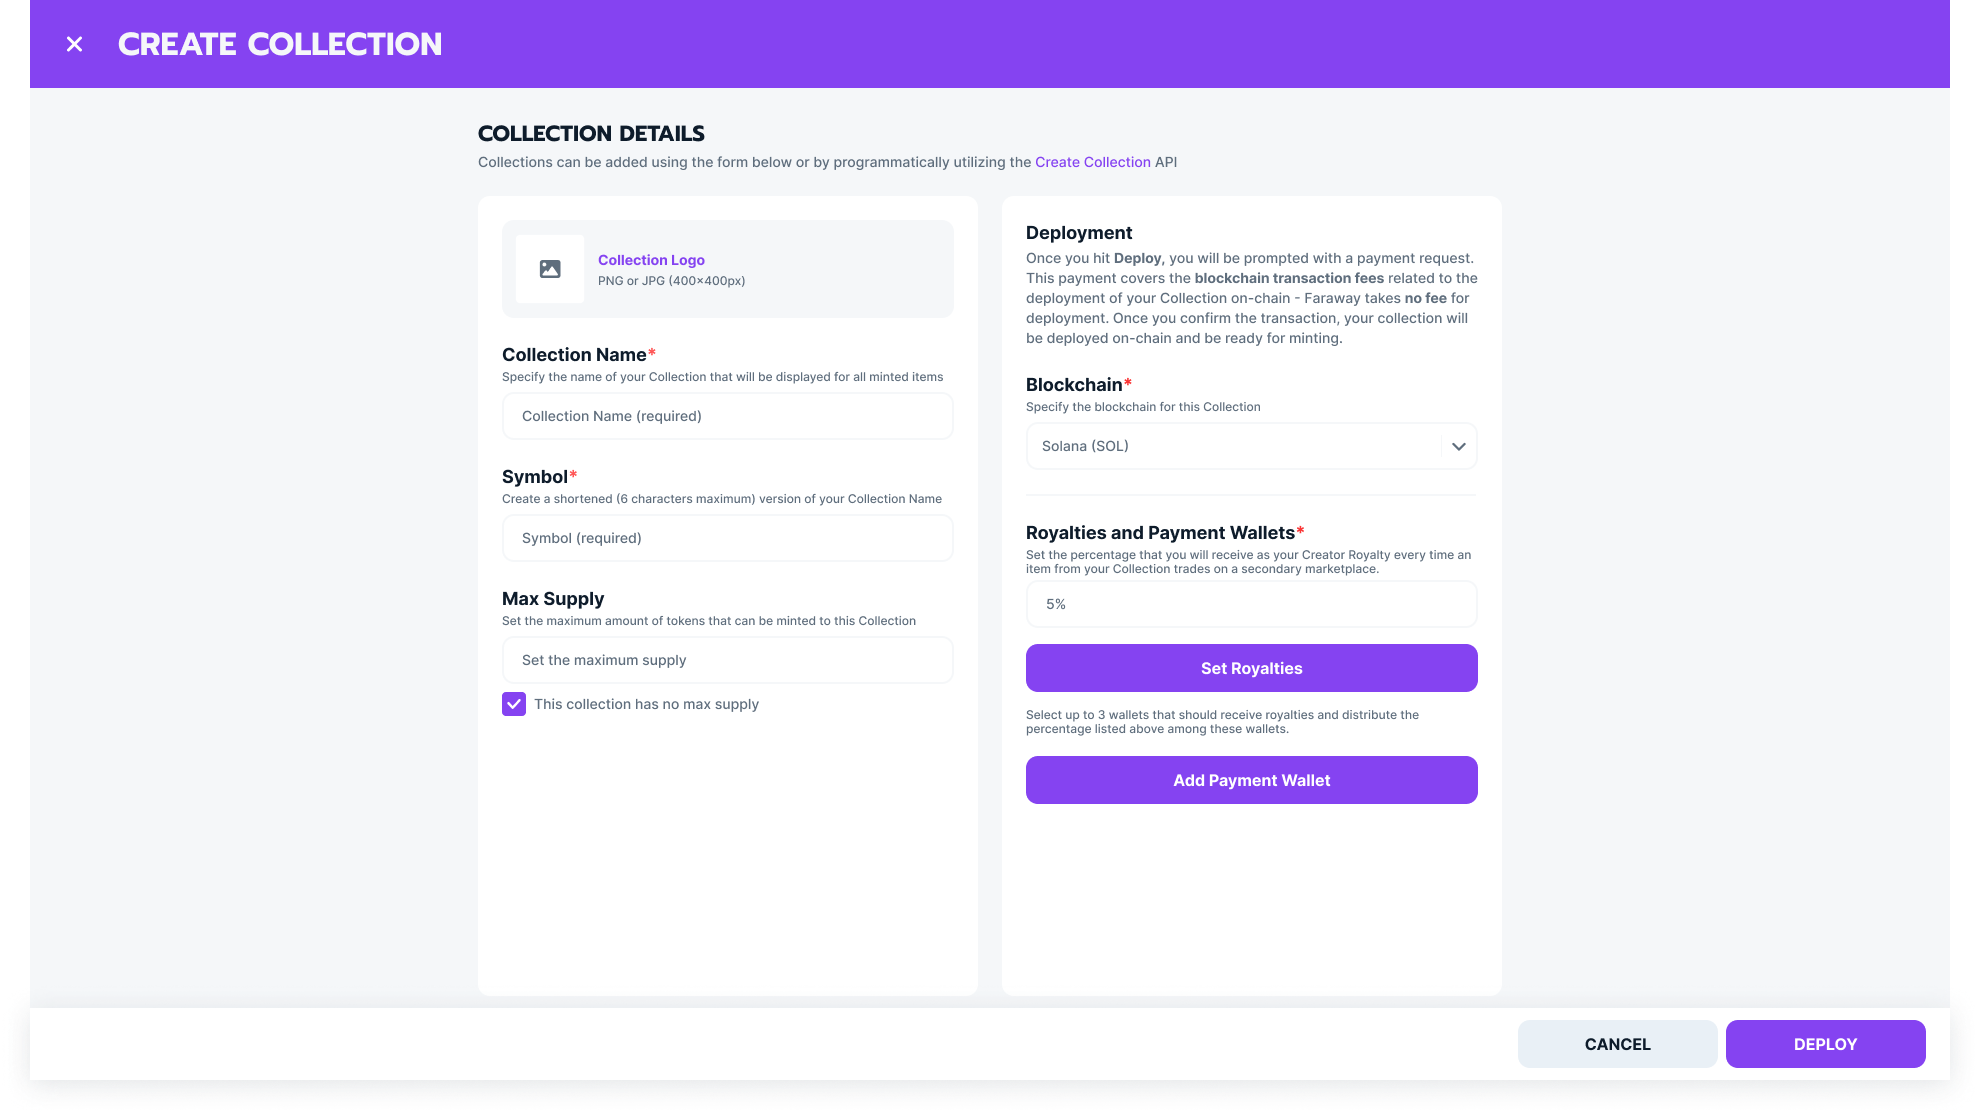
In the dialog that appears, enter the Collection Name and Collection Symbol that will be displayed for all items from this collection.-
Collection Name:
The name of your collection should be between 3 to 32 characters. It can include Latin letters, numbers, and some special characters (e.g., hyphens or underscores). -
Collection Symbol:
The symbol is the shortened version of your collection name. It should be between 3 to 10 characters and consist of Latin letters only.
-
-
Set Maximum Supply:
Specify the Max Supply of your collection. This refers to the maximum amount of minted items. If you want to deploy a collection with unlimited supply, choose the option: This collection has no max supply. -
Choose Blockchain:
In the Collection Deployment section, choose the blockchain where your collection will be deployed. -
Set Royalties:
After selecting the blockchain, specify the Royalties that you want to receive when items from your collection are sold on the secondary marketplace.
Click Set Royalties to distribute this amount between Project Wallets. -
Add Payment Wallets:
You can add up to 3 payment wallets to distribute the royalty amount. Click Add payment wallet to add them.
Specify the percentage of royalties that each wallet should receive. The total percentage distributed among wallets should equal the royalty percentage you set.

-
Deploy Collection:
After completing the collection setup, click Deploy to deploy your collection on-chain. Confirm the deployment process.
Note: You will not be able to edit the collection after deployment. -
Complete Deployment:
- Select a Payment Wallet:
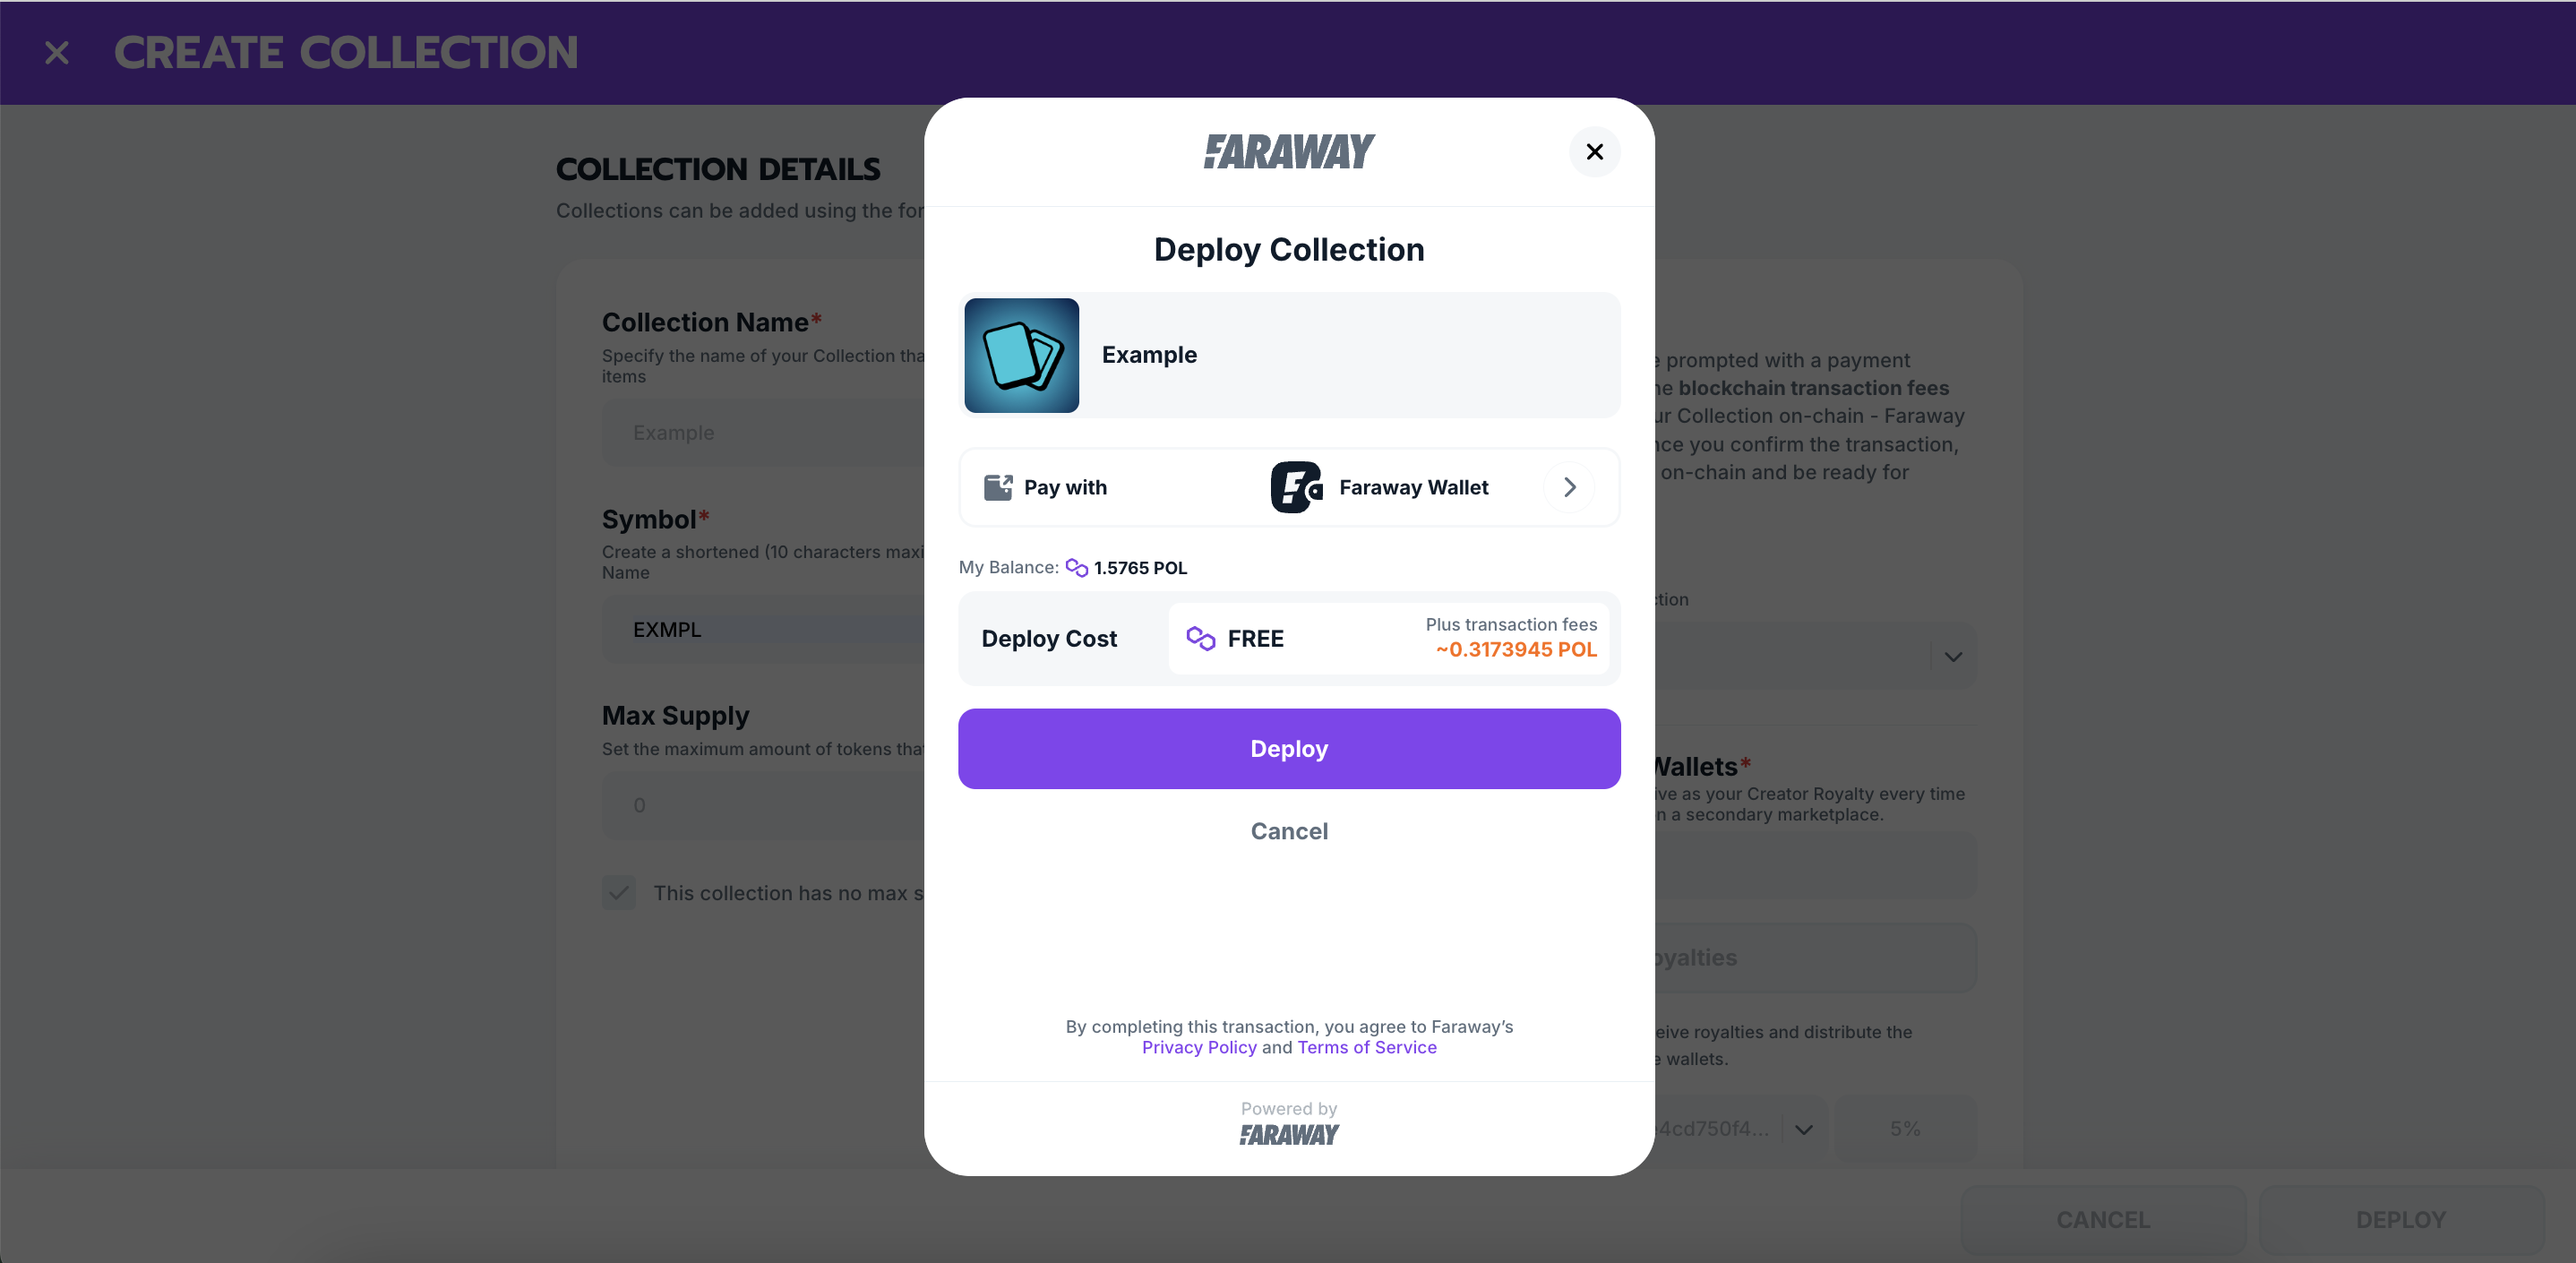
In the checkout dialog that appears, you can select any crypto wallet installed in your browser to pay for the transaction fees. For convenience, we recommend using your Faraway Wallet, which is integrated into your Faraway account.
You can deploy the collection using a wallet that is not listed as an Organization wallet. - Transaction Fee:
The platform does not charge a fee for creating a collection. However, you must pay the network fee for the blockchain where you are deploying the collection. The fee depends on the blockchain's network congestion and transaction costs at the time of deployment.
The network fee is paid in the native token of the selected blockchain, such as ETH (Ethereum), POL (Polygon), APE (ApeChain), or SOL (Solana). - Alternative Payment Option:
If you prefer, you can pay for the collection deployment using a credit card. This option is available during the checkout process.

If the transaction is successful, your collection will be marked as Active.
If the transaction fails or is delayed, your collection will remain in the Not Deployed status, and you can attempt to deploy it again later.
- Select a Payment Wallet:
Steps to Save Collection as Draft
-
Required Role:
Account Owner, Admin, or Developer. -
Save Collection:
If you haven’t configured API Keys and Callback & OAuth URLs for your project, you won’t be able to deploy the collection, but you can still create and save it as a draft. Follow the steps above to create the collection and click Save to store it as a draft. -
Edit Draft:
You can edit the saved Draft collection before deployment.
Steps to Deploy Draft or Not Deployed Collections
-
Required Role:
Account Owner, Admin, or Developer. -
Navigate to the Manage Section:
Click on the Manage section in the navigation bar and go to the Collections section. -
Deploy a Draft or Not Deployed Collection:
Open the table menu for the Draft or Not Deployed collection you want to deploy and click Deploy. -
Complete Deployment:
In the Checkout popup, choose the wallet to pay for transaction fees and click Deploy. If successful, the collection will be changed to Active status. If unsuccessful, it will remain in Not Deployed status and you can attempt the deployment again.
Steps to Archive Collections
-
Required Role:
Account Owner, Admin, or Developer. -
Archive a Collection:
In order to archive an active collection, navigate to the Collections section under Manage. -
Choose Collection to Archive:
Open the table menu for the Active collection you want to archive and select Archive. -
Confirm Archiving:
Confirm the archiving of your collection.
Note: Archiving will not remove your collection from the blockchain, but it will prevent the items from appearing in users' inventories.
Updated 7 months ago